


Tuesday, October 2, 2012

When an image is brought into Adobe Photoshop, it is usually in a color mode compatible with devices such as digital cameras and computer monitors. This is called the RGB color mode, and is based on the blending of Red, Green and Blue light. To screen print an image, the color mode must be converted to a type compatible with screen printing. The resulting image is called a Color Separation.
Separation types
Color separations for garment printing are generally divided into 3 types:• Process color
• Simulated process
• Spot color
Process color:
Process color separations use Cyan, Magenta, Yellow, and Black (CMYK) to create the colors in an image. Process color separations can be made by converting a file from the RGB Mode to the CMYK mode using Adobe Photoshop®. CMYK inks are transparent and blend on press.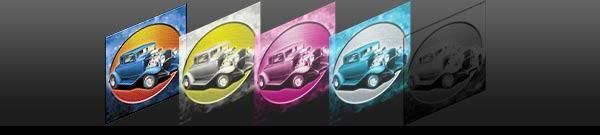
Process color printing usually requires more then just the 4 basic CMYK colors for a quality print. Adding a highlight white helps to control the lighter color ranges. Additional custom colors may also be included for spot color matching or out of gamut colors.
• Recommended for white or light colored garments. Increased difficulty on dark garments
• Requires the least number of screens for a full color image.
Simulated Process:
The Simulated Process technique offers the ability to print full color images on light or dark substrates. The inks used with this technique are semi-transparent, providing better coverage. but also blend on press like the Process colors.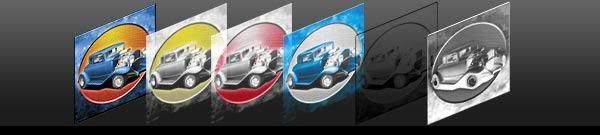
Like Process printing, Simulated Process uses a standard set of (up to 8) colors for most images. Separations can be customized for the image type and number of screens, reducing the colors to 5 or 6 when using a limited color palette.
• Requires a moderate number of screens for a full color image.
• Semi-opaque inks provide better coverage over dark garments.
• Uses a standard set of colors.
Spot colors:
Spot colors may be added to other types of separations, or used to create custom separations. Spot colors will match the colors in an image, and are set to Pantone® solid colors. In addition to even better coverage over dark garments, spot colors offer more consistency while printing and between print runs.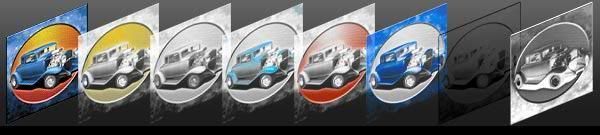
• Spot color Inks can be opaque or semi-opaque.
• Offers best coverage and color matching on dark substrates.
• Requires the most screens for a full color image.
Customized Color Separations
A color separation may use combination of these three separation styles, depending on the press and design requirements. For instance, a process color separation will often benefit from the addition of a spot color to increase the color range. A simulated process print may also include a process color or a custom spot color as needed. In practice, customized color separations are often used due to different printer/design requirements.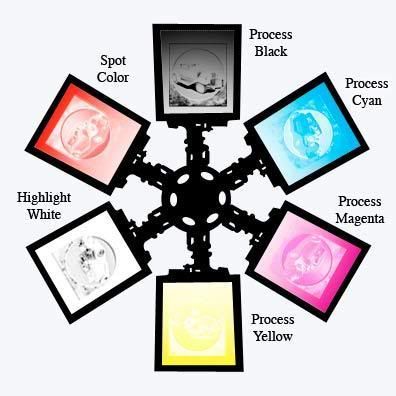
File Preparation
Properly prepared source files always improve a color separation and result in a better print. Image preparation should be done prior to color separation in the RGB mode. The checklist below outlines some basic elements of an image file prepared for separation.• Use the RGB Color Mode
• Image Resolution between 150 and 300 ppi
• Text merged into layers with AntiAlias Off
• Antialias off on imported Vector Graphics
• Transparent Background
• Color Profile Attached
• Save as a Photoshop file
Images should be in the RGB Mode prior to starting a color separation. The RGB mode provides the widest color range and the tools needed to prepare and adjust an image. Avoid converting to CMYK or other color modes before preparing a file for separation as
the image quality may be reduced.
Image resolution.
An image’s resolution needs to be adequate for the print size. Resolutions between 150 and 300 pixels per inch are recommended for images at 100% size. For photographs, scanned art, or images to be printed with a halftone, use a resolution of 150 ppi or higher. For text and graphics with or without an image use a resolution of 300ppi or higher.
In most cases increasing an images resolution by resampling will not improve image quality. However, If you plan on adding graphics or text to an image, masking the background, or making other changes, increase the images resolution prior to making these adjustments.
To change an images size use the Image Size dialog:
Image / Image Size
Checking the maximum print size.
Use the image size dialog to determine an images maximum print size.
• With the image size dialog open, Uncheck the Resample Image box. Set the resolution to 120ppi and note the images new Width and Height, this is the maximum print size for reproducing the image with Halftones. Image resolution should be 2.5 times the halftone line screen or higher.
Increasing an images resolution to add text and graphics
• With the Resample Image box Unchecked, Set the image Width and Height to the desired output size in the image size dialog. The resolution can be any amount above 120ppi.
• With the Resample Image box Checked, choose Bicubic as the resampling method and increase the resolution to 300 ppi. Click OK and save as a new file.
Resampling changes the actual pixels in an image, resulting in a loss of detail. Resampling should be used only once, and sparingly, on an image. For most images, a small amount of bicubic resampling may not be noticeable or may be mitigated. For text and graphic that are merged into layers, bicubic resampling will soften the edges
Anti-alias
Antialias is used to smooth the appearance of high resolution images on screen. This smoothing effect creates a slight blurring of edges when viewed up close, but actually creates a clearer image when viewed at various sizes. When printed, Anti-alias is represented with the line count used to reproduce the image. With Screen printing, an anti-alias edge would be represented with a 50 lpi dot. This 50 lpi anti-alias creates a visibly rougher edge then can be reproduced by screen printing with a higher resolution output.

• Edges with Anti Alias turned off print at the resolution of the file.
• Edges with Anti Alias On print at the resolution of the halftone line screen.
To keep edges sharp, graphics can be imported or bitmapped at a high resolution with the anti-alias off. Text set at 300 ppi can have the antialias set to None before merging into a normal layer. Be sure to check on small text and graphics as some details may be lost when antialias is removed.
Text
Text in documents will require fonts that may not be available on another computer. To transfer files containing text, text layers should be merged into normal, transparent layers with document resolution at 300 ppi or higher, and Anti Alias set to Off.
Exporting / Importing Vector files
A common approach to creating text and graphics is to use a Vector program such as ®Adobe Illustrator. Vector graphics are resolution independent, meaning they do not use pixels and bits to form an image. To use vector graphics in a color separation images need to be converted to a Raster format, ie; one that uses pixels and bits. When converting to a raster format, or rasterizing, image parameters such as resolution, antialias, color mode and color profile are set.
 Most
vector applications provide a method to save files in a rasterized
format. These options are usually under the Export menu. Export files as
Tiff with Zip compression to rasterize all the data. Some vector
formats can be opened and rasterized by Adobe Photoshop. Whether
importing or exporting vector files use the following settings when
available.
Most
vector applications provide a method to save files in a rasterized
format. These options are usually under the Export menu. Export files as
Tiff with Zip compression to rasterize all the data. Some vector
formats can be opened and rasterized by Adobe Photoshop. Whether
importing or exporting vector files use the following settings when
available.• Set resolution to 300 ppi.
• Export with Layers
• Export with AntiAlias OFF.
• Include the Color Profile.
• Use 8bit RGB mode
Transparent background.
To isolate the white channels in a color separation an image needs to be masked onto a transparent background. Using a transparent background provides control over the transition from the garment color to the printed colors, and can be used to manage the ink deposit as well. Image areas that fade to shirt color when screen printed should fade to a transparent background in the image file.
Some file types do not support transparent layers, images that do not contain layers are refered to as Flattened. Jpeg, PDF and older tiff formats do not display layered files and only support flattened images. Flattened image files will need to have the white background removed.
In Adobe Photoshop, a Background layer can be turned into an editable layer by double clicking on it in the layers palette.
With an editable layer the background can be removed using the erasure tool, or by creating a layer mask. Active selections created using any of Adobe Photoshop’s selection tools can be converted to a transparency mask by clicking the layer mask icon at the bottom of the layers palette.
A layer mask is visible as an additional, linked thumbnail in the layers palette, and as a mask channel in the channels palette. With a layer mask active, a layers transparency can be edited by painting or applying adjustments to the mask channel.
• All layers and layer effects over transparency should be in the “Normal” mode.
• Layered images should be previewed on black, gray and white backgrounds to ensure stray light and dark pixels are removed.
• Vector files can be exported with a transparent background when using a file format that supports layers.
The Color Profile.
A color profile is a bit of information that identifies the exact color space of the file, or device, it is associated with. Files should have a color profile attached so the correct colors can be displayed and printed. The color profile is used when opening a file and Adobe Photoshop will either use the profile to display the correct colors, or to convert the image to the working color profile, depending on the settings.
If a document has a color profile attached, the option to include the color profile will be available when saving. To see what profile is being used for an open file, and to convert an image to another profile, open the Convert to Profile window under the Edit menu.
Edit / Convert to Profile
If a color profile is not attached when a file is opened, Adobe Photoshops working profile will be used. If the working profile does not match the documents actual color the images colors will shift. The correct profile can be assigned if available with the Assign Profile option in Adobe Photoshop’s Edit menu:
Edit / Assign Profile
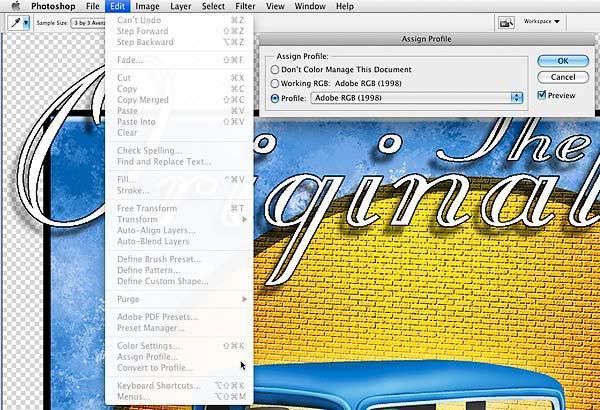
Assigning a color profile when one is not embedded in the document
• Only assign a profile if a document does not have one attached already. If your not sure what color profile to assign to an image file start with Srgb, click the preview box and see how the image changes. If the image does not change when the preview is turned off then it is the correct profile. Try different profiles to find one that fits the imageClick OK
Save a .PSD file with layers and a color profile.
Save files as Adobe Photoshop® files with layers and an attached color profile. Tiff files are also good if you can save with layers (Newer models). Use Zip compression and avoid other compression schemes, such as Jpeg and Gif, when preparing files for screen printing. Files can be zipped after saving using a Zip utility (WinZip, Stuffit) to decrease the file size.

Film Output
Colors from a color separation are output as positives on transparent film for screen printing. Film positives can be output onto sheets or rolls of film using inkjet printers. Inkjet printers with the correct film work well for output, are inexpensive, and readily available.Black and White
Film positives for making a screen printing stencil are printed with solid black shapes on a clear background. Gray tones that are not 100% white or black need to be converted to a shape or pattern. The most common approach is to use a Halftone dot.
Halftone Dots
Halftones are named by the number of dots used per inch, this it the halftone frequency. While the size of the white and black areas in a Halftone pattern changes, the number of dots per inch remain the same. The halftone dots create a pattern of light and dark . Overlapping halftone patterns can be rotated to reduce interference, or moire. The degree of rotation is called the Screen Angle.

Frequency
The size of the dot used is determined by the screen printing mesh. For simulated process and process printing it is best to keep the dots as small as possible, so using a fine mesh is best. Mesh counts between 195 and 355 are common, using halftone dot frequencies between 40 and 65 lpi.
To determine the halftone frequency divide the mesh count by 5
Increasing the mesh count can help to reduce moire.
• Underbase – use a 195 mesh with a 45 to 50 lpi halftone.
• Colors – Use 230 to 305 mesh with 50 to 55 lpi.
• Black and Highlight – Use 305 to 355 Mesh with 50 to 65 lpi.

Angle and the Moire Pattern
Moire appears as light and dark areas in an image when two regular patterns are overprinted. When halftone screens are used, their alignment can be changed by a few degrees to reduce this effect. The regular patterns that can cause Moire in screen printing include various halftone dots, the mesh itself, and the garment being printed on.
A good set of angles are: 22.5 – 52.5 – 82.5
On light colored garments the white, yellow and blacks can all be at the same angle: 22.5
The reds and oranges : 52.5
And the blues, greens and purples at the third angle: 82.5
On a dark colored garment put the under print at 22.5 and the black at 52.5.

Edge definition and Banding
When considering the quality of your film output it is important to look closely at the edges of the halftone dots, text and graphics. Output resolutions below 600ppi will leave halftone dots poorly defined. Output resolution is determined by the Printers resolution as well as the halftone conversion method.
The ability of a halftone to represent a grayscale is also determined by its output resolution. Lower output resolutions from a printer or a Rip (Raster Image Processor), can limit a halftones range of values, and the result is banding. Banding is an apparent step between different values in a grayscale. To eliminate banding, either increase the output resolution, or decrease the halftone screen count.
• Check for banding in the original image first. Banding can be caused by several factors before your image is output.
• If an image is smooth but the output is banded then it is caused by the output resolution and halftone line count.
• The number of gray levels that can be created by a halftone line screen at a specific output resolution can be calculated using a formula.
…………………………………………….
Where R is the output resolution and H is the halftone screen count
(R/ H)sq+ 1 = Gray levels
or
(The Output resolution (R), Divided by the halftone screen count (H)) squared +1 = the number of gray levels you can print.
For an output resolution of 720 and a line screen of 45 lpi
720 Divided by 45 = 16
16 x 16 + 1 = 257
…………………………………………….
According to the formula, at an output resolution of 720ppi, we will need to use a 45 line screen to get the 256 levels of gray we see on screen. In practice a 50 line screen works well with an output resolution of 720 ppi. If you do have problems with banding in your output, you can either reduce the halftone line count, or increase the output resolution, until the banding is eliminated.
Printing from Adobe Photoshop®
In Adobe Photoshop the output settings can be found in the print preview dialog. Under the file menu choose Print, or Print with preview In earlier versions:
( PS7 to CS2 ) File/Print with Preview:
Color Management
Print using the Print with Preview option.
• Select More Options to open the options dialog.
• Set the output drop down to Color Management.
• Set the print space to Document.
• Set the Color Handling Option to Separations.
Output Settings
• Change the Color Management Drop down to Output.
• Select Registration marks and labels.
(CS3 – CS4) File/ Print
Color Management
• Set the drop down to Color Management
• Set the print space to Document
• Set the Color Handling Option to Separations
Output Settings
• Change the Color Management Drop down to Output.
• Select Registration marks and labels.
Printing from Adobe Photoshop to a third party Rip
A Rip is a software program does the job of controlling a printers output, providing control over a range of functions including color conversion, ink deposit and dot patterns. A Rip can convert grayscale images to a halftone dot screen as part of its function to control a printers output. Some Rips do not produce dots large enough to be screen printed and are designed for color reproduction, while other Rips are developed to produce only film and can not be used for color printing. Consult the Rips instruction manual to ensure it is capable of creating the needed halftones and the proper setup procedure. A Rip needs to be properly configured to create quality film output. A good Rip will allow you to set your Screen angles and frequencies within Adobe Photoshop.
Output Settings – Dot Size, Shape and Angle
• Choose the Output Settings drop down in the print preview menu, click Screen to set the halftone dots. In the Screen Menu, uncheck “Use Default Screen” and set the Frequency and Screen Angle for each channel. Each spot color and CMYK channel can be selected from the drop down menu. Select Ellipse for the dot shape, and select Use Accurate Screens and Use Same Shape for All Inks.
Bitmap Halftones
High resolution 1 bit images can be printed straight to film with good results. Separation channels can be converted to halftones using the built in Bitmap function. Converting a document to grayscale or multichannel mode enables the bitmap mode option. Only the single, or top channel will be used in the conversion.
Dot Gain
All printing devices produce some dot gain which needs to be compensated for, and a Rip will allow for this gain by applying a linearization curve. A linearization curve can be made by taking a set of readings using a Transmission densitometer, measuring each 10% step along the value range from a printed halftone step wedge. These measurements are used to create a curve that compensates for the changes in dot size that result from printing.
Every printer is different in the amount of gain it produces on a particular film, so ideally we would want to create a Linearization curve for each printer and film combination. For screen printing we just need to get in the ballpark, however, so a generic curve will often work fine. To compensate for dot gain, apply a linearization curve to an image or separation channel prior to conversion to bitmap.
Converting Grayscale images to 1 bit Halftones.
To create a printable 1 bit halftone from an image, convert the document to gray scale using:
Image/Image Mode/ Grayscale
To create a printable halftone from Separation channels, move the channel you want to convert to the top of the channels palette. Convert the image to bitmap using:
Image/Image mode/Bitmap.

Settings:
• For resolution enter 720ppi for grayscale images and separations that require halftones,
select Pixels/inch in the drop down
• For conversion Method choose Halftone Screen.
Select OK.
(According to the Gray Level formula above, an output resolution of 720 ppi or higher is needed for a 50 Lpi halftone. For higher line screens, increase this resolution setting to avoid banding)
In the halftone screen dialog choose your dots size angle and shape:
• Set the Screen Frequency to 50 and set the drop down to Lines /inch
• Set the angle to 22.5
• Choose Ellipse for the shape.
Select OK.
Files can be converted back to grayscale and multichannel as needed, being careful not to resize or modify the image. If the image size needs to be changed, it is best to go back and modify the original and reconvert the image to Halftones. To convert the bitmap image back to a channel choose:
Image/Mode/Grayscale
Enter 1 in the Size ratio box and click OK,
Select:
Image/Mode/Multichannel.
To create a new spot color channel. Double click the channel to set its color.

Printing bitmap images onto film using a standard Printer Driver.
Files converted in this way can be printed straight to film using a standard printer driver, avoiding the need for processing with a Rip. Use a quality, transparent polyester film coated for inkjet printing, a printer with resolutions of 1440 or higher, and a quality ink such as ®Epson Black.
The quality of results from this technique depend entirely on the quality of the ink and film used. Inkjet printers using pigment based inks will require a specially coated waterproof film, while dye based inks generally print on coated, non-waterproof films as well. Most films are coated on a single side, and can be printed on the coated side only.
Printing from Adobe Photoshop
Using the same process as above; Select your printer in the Print with Preview menu, set the color management settings to separations, and the output settings to print labels and registrations marks if needed. Screens should be left to the default setting.
Click Print.
In the Printer Driver select the printer, set the Resolution and media type to print 1440 by 720 DPI or higher high quality Transparencies, Film or Gloss photo.
Increasing print density
In most cases using a resolution of 1440 will provide a high density print when applied to a quality film. In some cases the ink density can be increased by merely increasing the output resolution. In other cases increasing the density may be possible within the driver itself.
In the dialog below the driver has additional output controls which allow for increased ink density. It is important to remember that any increases to the ink density will increase overall dot gain from the output device. The minimum ink deposit required for an opaque print is best.
Save the setting as a Printer Preset and click Print.
0 Comments:
Subscribe to:
Post Comments (Atom)